Web Scraper API
Fetch real-time data from 100+ websites,No development or maintenance required.
SCRAPING SOLUTIONS
Get accurate and in real-time results sourced from Google, Bing, and more.
With 120+ prebuilt and custom scrapers ready for any use case.
No blocks, no CAPTCHAs—unlock websites seamlessly at scale.
Execute scripts in stealth browsers with full rendering and automation
PROXY INFRASTRUCTURE
Over 100 million real residential IPs from genuine users across 190+ countries.
Reliable mobile data extraction, powered by real 4G/5G mobile IPs.
For time-sensitive tasks, utilize residential IPs with unlimited bandwidth.
Fast and cost-efficient IPs optimized for large-scale scraping.
SCRAPING SOLUTIONS
PROXY INFRASTRUCTURE
DATA FEEDS
Full details on all features, parameters, and integrations, with code samples in every major language.
LEARNING HUB
ALL LOCATIONS Proxy Locations
TOOLS
RESELLER
Get up to 50%
Contact sales:partner@thordata.com
Products $/GB
Fetch real-time data from 100+ websites,No development or maintenance required.
Get real-time results from search engines. Only pay for successful responses.
Execute scripts in stealth browsers with full rendering and automation.
Bid farewell to CAPTCHAs and anti-scraping, scrape public sites effortlessly.
Dataset Marketplace Pre-collected data from 100+ domains.
Over 100 million real residential IPs from genuine users across 190+ countries.
Reliable mobile data extraction, powered by real 4G/5G mobile IPs.
For time-sensitive tasks, utilize residential IPs with unlimited bandwidth.
Fast and cost-efficient IPs optimized for large-scale scraping.
Data for AI $/GB
Pricing $0/GB
Docs $/GB
Full details on all features, parameters, and integrations, with code samples in every major language.
Resource $/GB
EN $/GB
产品 $/GB
AI数据 $/GB
定价 $0/GB
产品文档 $/GB
资源 $/GB
简体中文 $/GB
<–!>

<–!>

Scrapy is currently the most powerful and flexible Python web crawling framework. For many of us, it single-handedly carried entire projects when we first tackled large-scale data collection. However, as the number of spiders grows, concurrency demands explode, and local machine resources get completely drained, managing, monitoring, and scaling becomes a genuine nightmare. This is exactly why Scrapy Cloud exists—it takes the Scrapy spiders you worked hard to write and throws them straight into the cloud, making deployment, execution, scheduling, and storage one-click simple. No more waking up in the middle of the night to restart crashed processes.
This article will walk you through every step of setting up and using Scrapy Cloud to run spider jobs, from initial deployment to advanced features. We’ll also cover some Scrapy Cloud alternatives to help you choose the best option for your project needs, ensuring your web scraping workflow is both efficient and reliable.
Scrapy Cloud is a professional cloud hosting platform provided by Zyte (formerly Scrapinghub), specifically designed for deploying, running, and managing Scrapy web crawlers. It moves all the complex processes—crawler deployment, job scheduling, and monitoring—entirely to the cloud, freeing developers from server maintenance and infrastructure management. As the official description puts it: “Think of it as Heroku for web data extraction.”
Users control the entire crawling workflow through a clean web interface or API, creating a seamless pipeline from code deployment to data export. This hosted service is especially ideal for teams that need to go live quickly and prioritize operational efficiency, allowing developers to focus completely on data extraction logic instead of environment configuration.
The core idea of Scrapy Cloud is to fully migrate your local Scrapy project to run in cloud containers with a highly automated process. You deploy once, and everything afterward is handled via the web dashboard or API.
● Project setup: Create a new project on Scrapy Cloud—essentially a dedicated workspace for your crawlers. After creation, upload your Scrapy spider code and manage updates via version control.
● Infrastructure deployment: Scrapy Cloud automatically configures underlying servers and network resources, handling load balancing and allocation. This eliminates manual server setup and ensures crawlers run in an optimal environment.
● Spider execution: When you trigger a spider job, Scrapy Cloud spins up a containerized instance to perform the crawl. It manages the request queue and concurrency, automatically throttling speed based on site responses to avoid blocks.
● Real-time monitoring & logging: The platform provides a live dashboard showing job status, error logs, and performance metrics. You can quickly diagnose issues like network timeouts or parsing errors through the logs.
● Data export & storage: Once scraping is complete, data is automatically exported in formats like JSON or CSV and stored in the cloud. Scrapy Cloud also supports integration with external services (S3, FTP, Webhooks, etc.) for downstream analysis.
● Scaling & optimization: Resources automatically scale based on load—for example, adding compute power during peak periods. This ensures stability and efficiency for large-scale jobs. It also supports environment variables, custom dependencies, and seamless integration with Zyte API for automatic JS rendering and anti-blocking.
Integrating proxy services in Scrapy Cloud is crucial for bypassing IP bans and improving anonymity. By configuring proxy middleware, you can easily inject residential proxies or datacenter proxies into crawler requests, ensuring uninterrupted data flow.
![]() Pay special attention when buying proxies—we recommend providers offering high anonymity to avoid detection by target sites.
Pay special attention when buying proxies—we recommend providers offering high anonymity to avoid detection by target sites.
Proxy management in Scrapy Cloud is typically handled via environment variables or custom settings, enabling dynamic IP rotation. In my tests scraping Amazon product listings, combining Scrapy Cloud with quality proxy solutions increased success rates by at least 30%, and we never encountered issues with anti-bot mechanisms. The Scrapy documentation covers how to integrate proxy middleware to help optimize your setup.
Scrapy Cloud offers a robust set of features designed to simplify crawler management and boost productivity. These cover the entire lifecycle from deployment to monitoring, making web scraping far more efficient and reliable. Overall, its core strengths lie in automation and integration, minimizing the need for manual intervention.
● One-click deployment – Upload and update spider code quickly via CLI or GitHub, streamlining releases.
● Real-time monitoring – Dashboard shows job progress, errors, and performance metrics for immediate adjustments.
● Job scheduling – Set recurring tasks to run crawlers automatically (e.g., daily updates).
● Data export – Built-in storage and export in multiple formats (JSON, CSV) with cloud storage integration.
● Proxy integration – Native proxy support for easy IP rotation and improved stability.
● Scalability – Automatically adjusts resources for high-concurrency jobs.
● Headless browser API – Supports Zyte API for JS-heavy sites.
● Team collaboration – Multi-user access control, perfect for enterprise projects.
● Error handling – Automatic retries for failed requests with detailed logs for debugging.
Despite its many conveniences, Scrapy Cloud has limitations that may make it unsuitable for certain scenarios. Understanding these helps you decide whether to stick with it or seek alternatives.
● Limited customization – The platform is relatively rigid; you can’t deeply modify underlying infrastructure. Some highly specialized spiders (e.g., those requiring browser drivers or specific kernel modules) simply won’t run.
● No native distributed crawling – While it scales, it lacks true distributed crawling across regions, which can hurt efficiency on very large projects.
● Very low free/low-tier units – 1–2 units choke on anything beyond small projects; you quickly have to keep adding units, and costs skyrocket.
● Infrastructure dependency – You’re entirely reliant on Zyte’s cloud. If their service goes down, your scraping stops.
● Cost accumulation – Free tier has strict limits on concurrent jobs and storage. Scaling up pushes you into paid plans quickly, and costs rise fast with usage.
● Noticeable cold-start latency – Free/low-tier containers often sleep; triggering a job can take 30–90 seconds before crawling actually begins—disastrous for real-time needs.
● Learning curve – Advanced features (proxy integration, custom scheduling) take time for beginners to master.
Here’s exactly how to get started:
1. Create a free Scrapy Cloud account on Zyte.
2. Log into the dashboard, choose “Deploy your own code,” and name your project.

3. Click “Create project.”
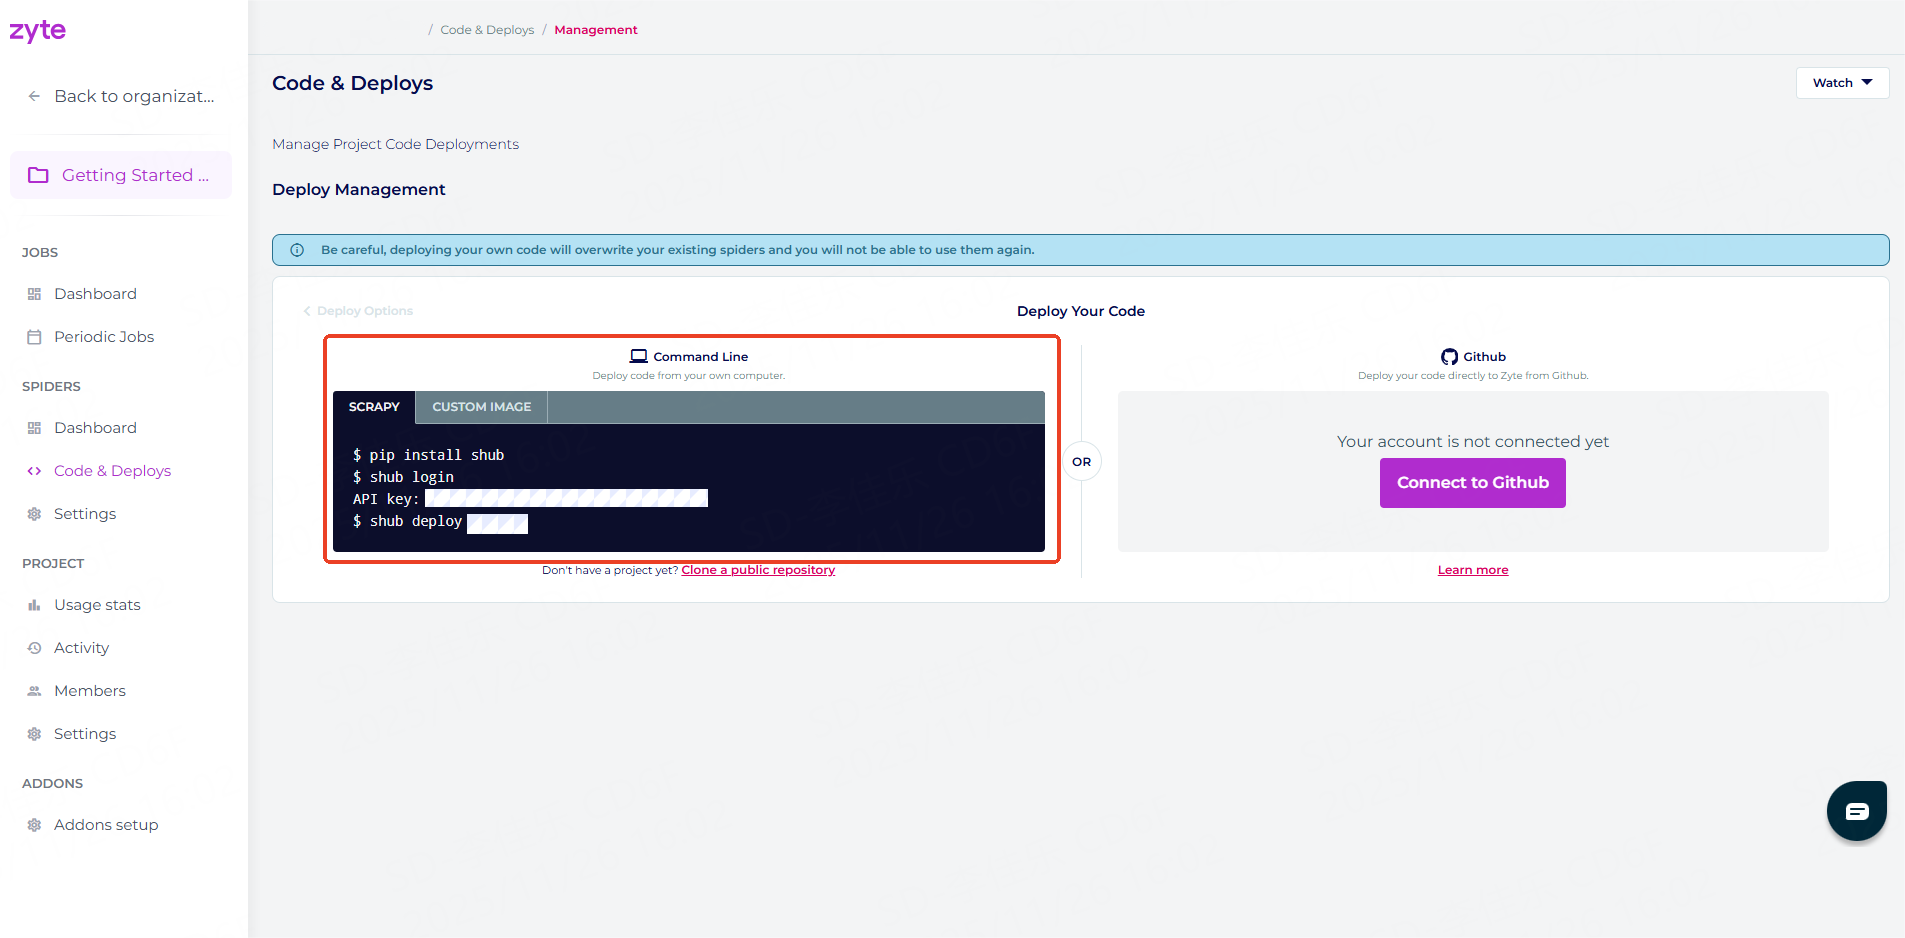
4. Once created, you’ll be taken to the deployment page. You can deploy your Scrapy crawlers in two ways:
● Command-line tool (shub)
● Automatic GitHub deployment
![]() We’ll use the command-line method below.
We’ll use the command-line method below.
Using the shub CLI tool is an efficient way, especially for terminal-savvy users.
We’ll use Scrapy’s official public example project booksbot (scrapes books.toscrape.com) to demonstrate the full process.
Clone the repo:
git clone https://github.com/scrapy/books.git
cd booksbot![]() Here are the detailed deployment steps:
Here are the detailed deployment steps:
1. Install the shub command-line tool using the following command:
pip install shub2. Run shub login to connect the shub client to your Scrapy Cloud project. When prompted, enter your Scrapy Cloud API key for authentication:
shub login
API key: YOUR_API_KEY![]() Tip: You can find your API key in the “Code & Deploy” section of the dashboard.
Tip: You can find your API key in the “Code & Deploy” section of the dashboard.
3. Deploy your Scrapy project to Scrapy Cloud using the following command:
shub deploy PROJECT_ID![]() Tip: You can find your Project ID in the “Code & Deploy” section of the dashboard.
Tip: You can find your Project ID in the “Code & Deploy” section of the dashboard.
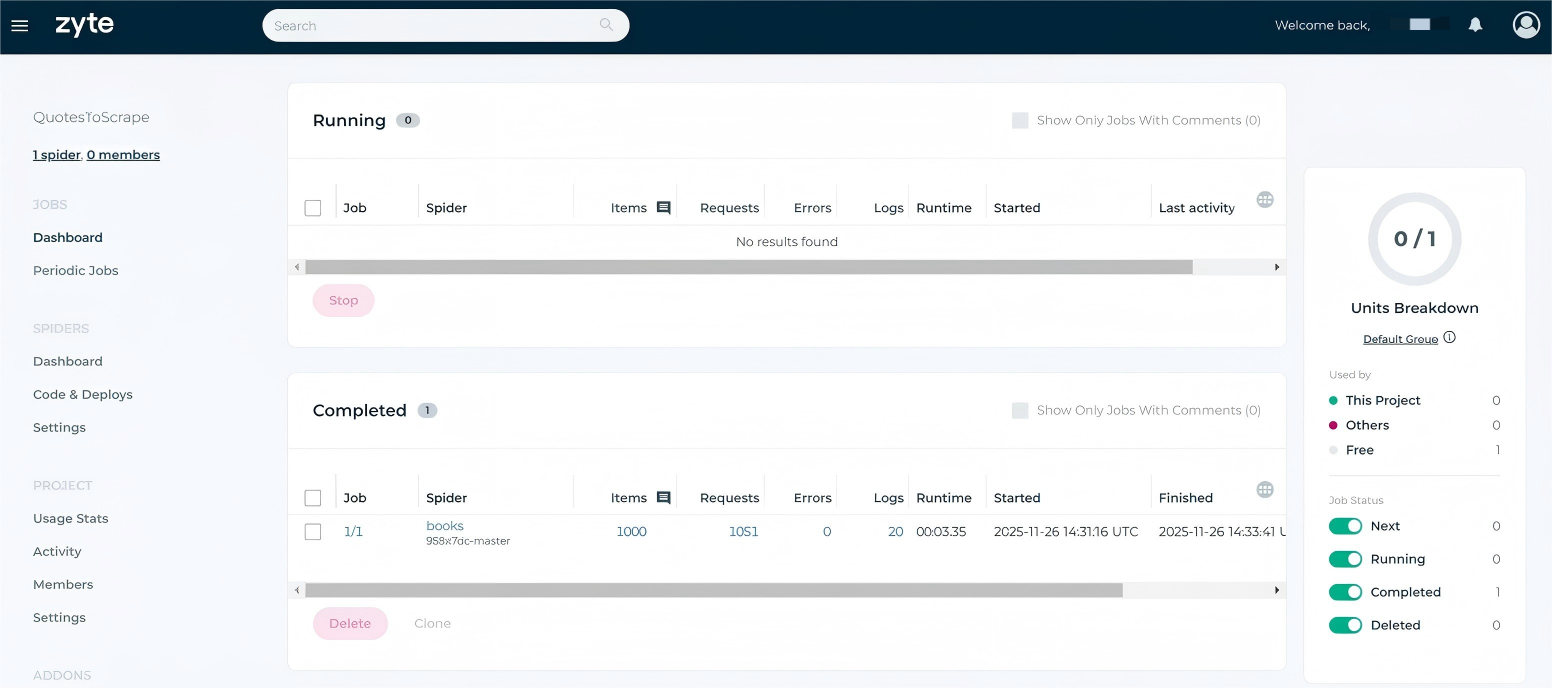
Once your Scrapy project has been successfully deployed, check the project status in the Scrapy Cloud dashboard—if everything went well, you’ll see a spider named booksbot.
Once your spider is deployed, running crawler jobs on Scrapy Cloud becomes extremely straightforward—you can trigger them directly through the web interface or API.
1. In the Spiders dashboard, select the spider you want to run and click Run.
2. Before launching, you can optionally set parameters, tags, priority, etc.
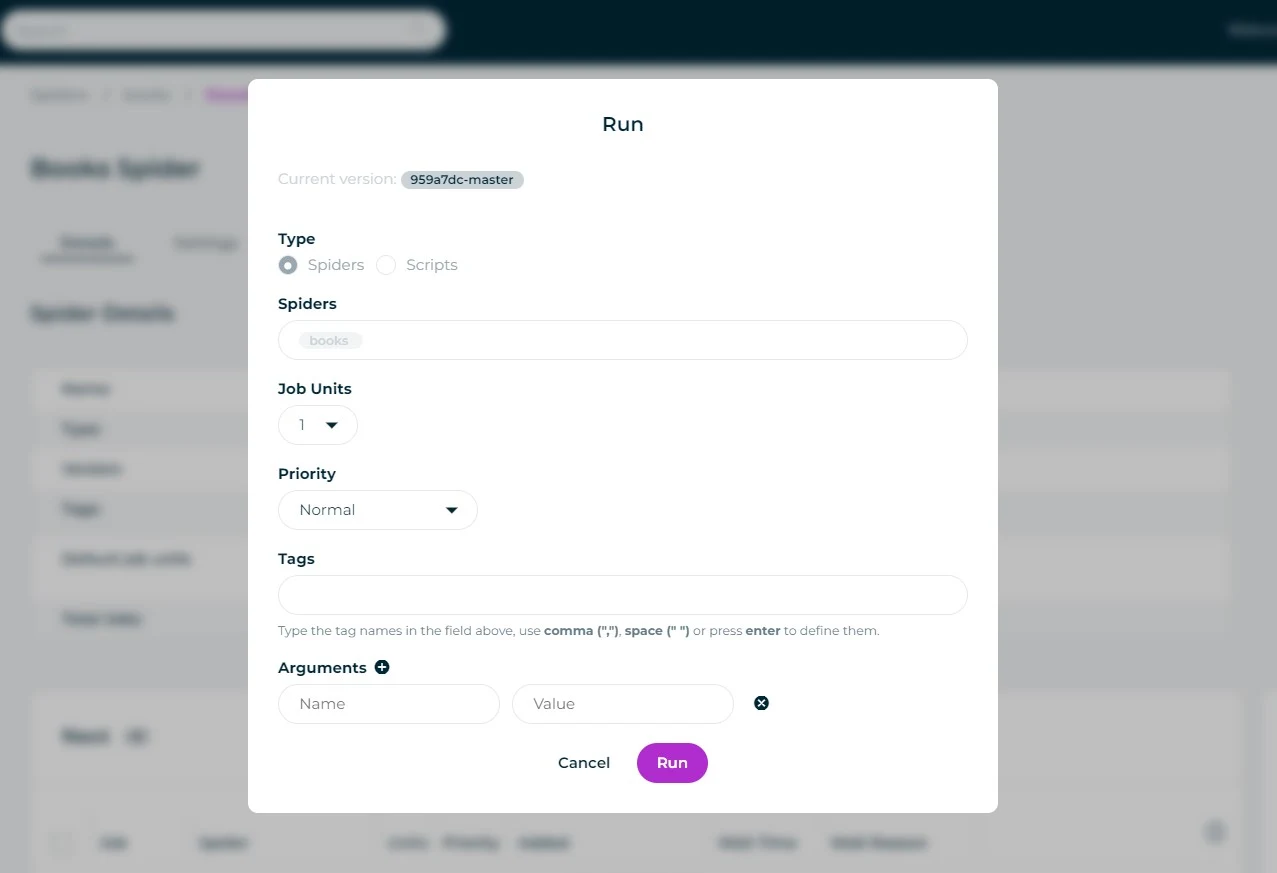
3. When ready, click Run to start the spider.
In the dashboard, you can monitor the job’s real-time progress, with statuses such as queued, running, or completed.
![]() You can also trigger via API:
You can also trigger via API:
shub jobs run booksbot --param category=travelScrapy Cloud uses a Cron-like scheduler, so you can easily configure periodic jobs to automatically run your spiders and keep your data fresh. This removes the need for manual launches and guarantees timely, consistent scraping.
![]() To set up scheduling:
To set up scheduling:
1. Navigate to the Periodic Jobs section in the dashboard and click Add periodic job.
2. The system will then prompt you to select the spider you want to schedule, along with its runtime, frequency, and other parameters.
3. Save the settings, and the spider will automatically run according to your defined interval.
![]() Note: The periodic jobs feature is only available on paid plans. You’ll need to subscribe to a Scrapy Cloud paid plan (starting at $9/month).
Note: The periodic jobs feature is only available on paid plans. You’ll need to subscribe to a Scrapy Cloud paid plan (starting at $9/month).
If you’re looking for Scrapy Cloud alternatives, Thordata Web Scraper API is a powerful option that simplifies web scraping via API—no crawler infrastructure to manage. Compared to Scrapy Cloud, it focuses more on instant usability and easy integration, ideal for rapid prototyping or resource-constrained projects.
● No code deployment – Trigger scraping directly via HTTP requests, saving development time.
● Built-in proxy rotation – Automatic IP rotation with a 60M+ ethical residential proxy pool, virtually eliminating blocks.
● JavaScript rendering support – Handles dynamic content like Selenium but without browser overhead.
● High scalability – Automatically scales for sudden traffic spikes.
● Structured output – Returns clean JSON ready for immediate use.
● AI-powered parsing – Automatically detects lists, pagination, product details, etc.
● Cost-effective – Pay-per-use pricing often cheaper than full-featured platforms.
![]() Learn More About Scrapy vs. Selenium!
Learn More About Scrapy vs. Selenium!
Scrapy Cloud provides cloud-hosted Scrapy crawler management that dramatically simplifies deployment, monitoring, and scheduling, letting developers focus on data logic. However, its limited customization and accumulating costs may not suit highly custom or budget-sensitive projects.
As a lighter-weight alternative, Thordata Web Scraper API offers an API-driven scraping solution that’s especially strong for quick integration and proxy-heavy jobs. It lowers the entry barrier significantly. Evaluate your specific needs and choose the option that delivers the most efficient and reliable web scraping strategy for you.
We hope the information provided is helpful. However, if you have any further questions, feel free to contact us at support@thordata.com or via online chat.
<--!>
Frequently asked questions
What is Scrapy cloud?
Scrapy Cloud is a managed platform provided by Zyte for running, scheduling, and monitoring Scrapy spiders without requiring users to manage server infrastructure themselves.
How to use Scrapy Cloud?
First, register an account, then create a project and deploy your spider code. You can run the spider through the dashboard or command line and set up scheduled jobs to automate scraping tasks.
What is Scrapy used for?
Scrapy is a Python framework designed for efficient web scraping and spidering. It is used to extract structured data from websites and is applicable in scenarios such as e-commerce price monitoring, search engine building, academic data collection, and commercial intelligence—essentially any use case that requires large-scale extraction of publicly available web data.
<--!>
About the author
Anna is a content specialist who thrives on bringing ideas to life through engaging and impactful storytelling. Passionate about digital trends, she specializes in transforming complex concepts into content that resonates with diverse audiences. Beyond her work, Anna loves exploring new creative passions and keeping pace with the evolving digital landscape.
The thordata Blog offers all its content in its original form and solely for informational intent. We do not offer any guarantees regarding the information found on the thordata Blog or any external sites that it may direct you to. It is essential that you seek legal counsel and thoroughly examine the specific terms of service of any website before engaging in any scraping endeavors, or obtain a scraping permit if required.
 Looking for
Top-Tier Residential Proxies?您在寻找顶级高质量的住宅代理吗?
Looking for
Top-Tier Residential Proxies?您在寻找顶级高质量的住宅代理吗?
How to Scraping Dynamic Websites with Python?
In this article, learn how to ...
Anna Stankevičiūtė
2026-03-03
Scraping Yahoo Finance using Python
Xyla Huxley Last updated on 2026-03-02 10 min read […]
Unknown
2026-03-03
TCP Deep Dive with Wireshark
Xyla Huxley Last updated on 2026-03-03 6 min read TCP i […]
Unknown
2026-03-03
Web Scraping with Python using Requests
Xyla Huxley Last updated on 2026-03-03 6 min read Web c […]
Unknown
2026-03-03
Crawl4AI: Open-Source AI Web Crawler with MCP Automation
Xyla Huxley Last updated on 2026-03-03 10 min read AI a […]
Unknown
2026-03-03
Using Wget with Python: A Practical Guide for Reliable, Scalable Web Data Retrieval
Xyla Huxley Last updated on 2026-03-03 10 min read […]
Unknown
2026-03-03
How to Make HTTP Requests in Node.js With Fetch API (2026)
A practical 2026 guide to usin ...
Kael Odin
2026-03-03

How to Scrape Job Postings in 2026: Complete Guide
A 2026 end-to-end guide to scr ...
Kale Odin
2026-03-03

BeautifulSoup Tutorial 2026: Parse HTML Data With Python
A 2026 step-by-step BeautifulS ...
Kael Odin
2026-03-03
